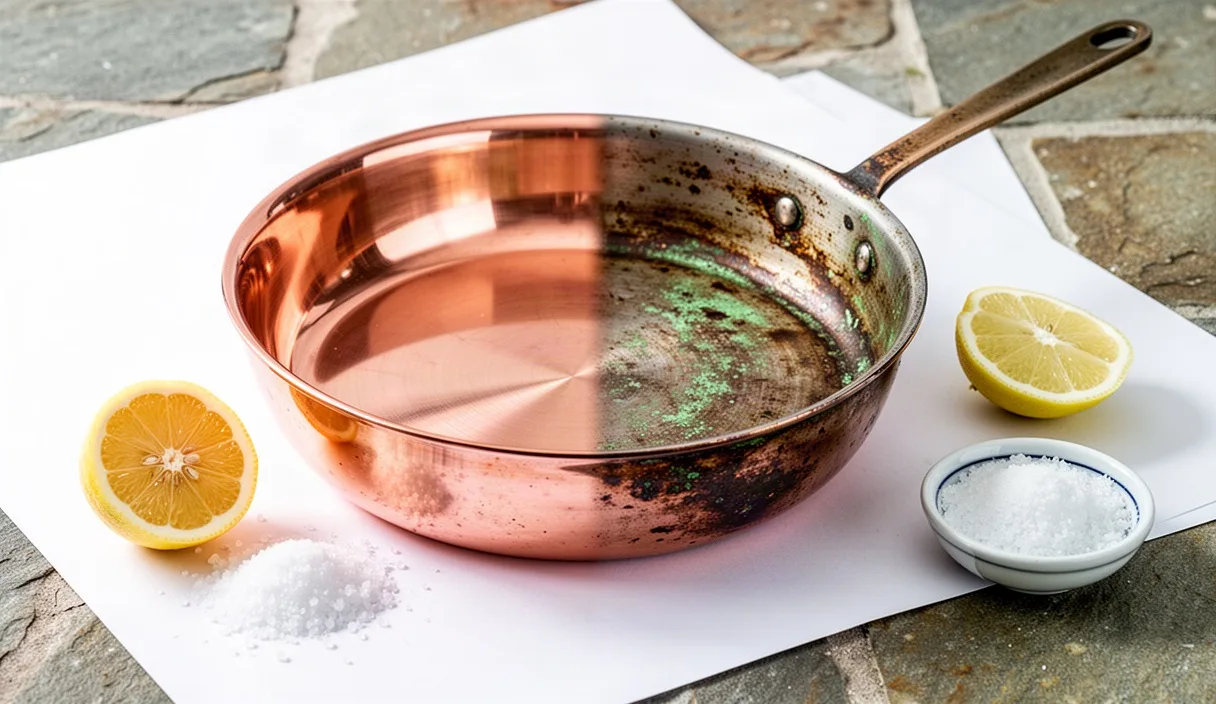
When a heavy copper sauté pan sits above a wood-fired range or on a brass pot rack for a season, it gathers a quiet, darkened coat. The metal does not stay salmon-pink on its own. Exposure to ambient oxygen, humidity, grease vapors, and gas combustion leaves a crust of brownish-gray tarnish over the exterior shell. Many commercial pastes promise quick results, but they often leave chemical residues that smell harsh when the metal hits the burner again. We prefer the old kitchen workshop approach, using nothing more complex than a halved lemon and a handful of coarse salt.
This method treats the pan as a working tool rather than an ornament. The technique relies on mild food acids to strip away surface oxides while leaving the underlying gauge of metal untouched. Handled with patience and clean cotton cloths, this simple friction scrub lets us control the depth of clean, bringing back the warm, honeyed glow of spun or hammered copper without stripping away the micro-texture that tells the story of how the vessel was made.
The Chemistry of Copper Oxide and Weak Organic Acids
Copper reacts readily with atmospheric elements. When bare copper contacts oxygen, it forms cuprous oxide (Cu2O), a reddish film that gradually deepens into cupric oxide (CuO), which appears dull brown or black. In kitchens with gas ranges, trace sulfur compounds in the fuel accelerate this shift, creating thin layers of copper sulfide alongside the oxides. These layers are chemically bound to the exterior surface, meaning water and ordinary dish soaps slide right over them without lifting the discoloration.
Citric acid, found in concentrations of roughly 5 to 8 percent in fresh lemon juice, possesses a low pH sufficient to break the ionic bonds of copper oxide. The acid converts insoluble copper oxides into soluble copper citrate complexes. Left on its own, lemon juice dissolves this oxide coat slowly. When we introduce sodium chloride, the chemical reaction quickens through the generation of copper chloride intermediates. The chloride ions accelerate the dissolution rate, enabling the weak plant acid to accomplish in two minutes what might otherwise take an hour of soaking.
| Acid Type | Typical pH | Abrasive Carrier | Action on Metal |
|---|---|---|---|
| Citric (Fresh Lemon) | 2.2 to 2.6 | Coarse Sea Salt | Rapid oxide lift; mild brightening; safe on skin |
| Acetic (White Vinegar) | 2.4 to 2.8 | Table Salt or Flour | Steady oxide lift; prone to streaking if dried |
| Commercial Oxalic Paste | 1.2 to 1.8 | Silica Powders | Aggressive stripping; requires gloves and heavy rinsing |
The mechanical action of the salt grains is just as critical as the chemical dissolution. As the salt crystals slide across the metal under the cushion of lemon pulp, they dislodge the softened oxides without gouging the virgin copper beneath. Because sodium chloride gradually dissolves into the lemon juice as you work, the abrasive grit self-regulates, becoming finer and smoother as the scrub proceeds across the curved belly of the pan.
Lemon Halves and Salt: The Traditional Kitchen Method
Before touching the exterior with acid, we wash the pan with warm water and basic dish soap to remove loose grease and food splatters. Acid applied over grease will bead up and create an uneven, patchy finish. Once the pan is clean and damp, set it on a thick folded towel inside a utility sink or on a broad wooden work table that can tolerate water.
Slice a firm, thick-skinned lemon across its equator. A lemon with plenty of pith provides a stiff, comfortable handle that keeps your fingers from cramping during prolonged friction. Pour roughly three tablespoons of coarse kosher salt into a shallow ceramic saucer. Press the cut face of the lemon half firmly into the salt until crystals embed into the exposed pulp pockets.
- Initial Contact: Place the salt-crusted lemon face directly against the tarnished copper wall. Press gently until juice squeezes into the salt, then move the lemon in small, overlapping circles roughly four inches wide.
- The Clearing Wave: Within five to ten seconds, the dark film will loosen and melt into an orange-tinted liquid slurry. Work systematically from the base rim up toward the rolled lip of the vessel.
- Replenishing Abrasive: As the salt dissolves under the pressure of the juice, dip the lemon back into the salt dish. Avoid pushing dry salt across dry metal; always ensure a steady cushion of fresh lemon juice beneath the abrasive face.
- Tough Heat Rings: For stubborn, blackened heat rings around the bottom perimeter, sprinkle coarse salt directly onto the copper, squeeze juice over it to create a thick paste, and allow it to sit undisturbed for sixty to ninety seconds before scrubbing with the lemon rind.
Keep your movements deliberate and circular. Linear strokes along the wall of a round vessel can leave directional tracks in the soft metal. Circular buffing distributes the slurry across high spots and tool marks, maintaining a balanced surface across the entire profile of the pan.
Working Around Brass Handles and Iron Rivets
Traditional cookware construction pairs heavy copper bodies with cast iron, wrought iron, or cast brass hardware. Each of these secondary metals reacts differently to the salt and lemon mixture, requiring deliberate care to prevent permanent damage or ugly staining.
Cast brass handles, secured with brass or copper rivets, tolerate the citric acid slurry quite well. In fact, the lemon and salt will clean the brass along with the copper, though brass responds more slowly due to its zinc content. When scrubbing the seam where the handle base joins the vessel body, use an old horsehair bristle brush or a firm toothbrush loaded with the lemon slurry to reach into the crevices around the cast detailing.
Cast iron handles and hand-forged iron rivets demand the opposite treatment. Citric acid and sodium chloride will attack raw iron almost instantly, triggering flash rust that leaves bright orange stains on both the handle and the neighboring copper. Keep the lemon and salt at least a half-inch away from iron hardware whenever possible.
- Inspect the rivets on the interior and exterior to identify the metal. Dark, magnetic rivets are iron; golden or reddish non-magnetic rivets are brass or copper.
- If the rivets are iron, coat them lightly with mineral oil or melted beeswax using a cotton swab before you begin applying the lemon wash to the copper. This temporary barrier sheds stray acid.
- If lemon juice accidentally spatters onto an iron handle, blot it away immediately with a clean, damp cloth rather than scrubbing it across the iron face.
Neutralizing the Acid Wash with Clear Water
The copper may look radiant while wet with citrus slurry, but the chemical process does not halt on its own. Residual citric acid and chloride ions left in pores or seams will continue to etch the copper, leading to chalky green spots known as verdigris within twelve to twenty-four hours. Neutralizing and flushing this acid is non-negotiable.
Carry the pan immediately to a deep sink and flush the exterior with warm running water. While the water runs, wash the outer surface thoroughly with a soft sponge lathered with alkaline dish soap or a mild baking soda solution (two tablespoons of baking soda dissolved in a quart of warm water). The mild alkaline wash halts the acid action instantly and dissolves remaining salt crystals tucked beneath rim rolls and rivet caps.
Pay close attention to the interior lining of the pan. Most copper cookware is lined with pure block tin or stainless steel. While stainless steel is impervious to lemon juice, tin is a soft, amphoteric metal that can dull or darken if soaked in strong acids. Rinse the interior chamber thoroughly to guarantee no stray citrus juice dries against the tin lining. After rinsing, the water sheeting across the exterior copper should run completely clear, free of foaming or stickiness.
Hand-Buffing for Deep Luster Without Smudges
Drying must happen the moment the final rinse ends. Water left to evaporate naturally on raw, freshly cleaned copper leaves distinct mineral rings and pale water marks that require repeated polishing to eliminate. Keep two clean, dry cloths ready beside the sink before you turn off the faucet.
For the initial wipe, use a heavy cotton flour sack towel or a thirsty waffle-weave linen cloth. Blot the bulk moisture from the pan, then wrap the towel over your palms to support the vessel. Copper conducts human body heat instantly, and bare fingertips will leave faint perspiration marks on the fresh, chemically bare metal. Always manipulate the clean pan through clean cloth barriers until the metal is dry and cool.
Once dry, shift to a secondary buffing rag. We prefer unbleached cotton flannel or dense, washed linen. Fold the rag into a firm pad and rub the copper using steady, vigorous pressure in wide sweeping strokes around the circumference of the vessel. The natural friction of the cotton warms the copper slightly, burnishing down any micro-roughness left by the salt crystals and teasing out a deep, glassy glow.
If you encounter a slight cloudy haze during buffing, do not reach back for the lemon. Instead, sprinkle a teaspoon of dry cornstarch or wheat flour onto the buffing cloth. The dry flour absorbs micro-moisture, lifts grease streaks, and acts as an ultra-mild, dry polishing agent that clarifies the reflections across the face of the vessel.
Deciding Between High Polish and Natural Kitchen Aging
In our workshop and kitchen, we distinguish between a pan prepped for show and a pan prepped for daily service. A mirror-bright polish is striking on an open larder shelf, but the moment that copper meets an open gas burner, heat tarnish begins anew. The bottom corners shift to violet, gold, and amber as the metal passes three hundred degrees Fahrenheit.
Continual aggressive polishing with acids and abrasives slowly wears down the copper over decades. While copper pans possess thick walls (often between 1.5 and 3 millimeters of solid metal), excessive scrubbing around repoussé work, brand stamps, and rivet heads gradually softens the crispness of the maker marks. There is deep functional beauty in an honest kitchen patina, a stable, satiny, nut-brown surface that shields the metal from erratic environmental spotting.
| Finish Approach | Maintenance Frequency | Recommended Care | Kitchen Role |
|---|---|---|---|
| Bright Kitchen Polish | Every 2 to 4 weeks | Gentle lemon and fine salt; thorough neutralization; immediate dry buff | Hanging display, presentation ware, historic collections |
| Working Warm Patina | Twice per year | Hot water wash; soap wipe; spot-clearing grease without acid dips | Daily saucepans, reduction skillets, sugar pots |
We often compromise by polishing the curved sides and polished handles of our sauté pans once every season, while leaving the heavy base plate unpolished. The underside darkens into a hard, fire-cured bronze that absorbs radiant heat from the burner efficiently, while the exposed walls catch the kitchen light and show the clean grain of the craftsmanship.
Common Mistakes to Avoid
Even with a process as straightforward as salt and lemon, a few common errors can compromise the metal or create unnecessary extra work:
- Using Table Salt with Chemical Anti-Caking Agents: Standard iodized table salt often contains sodium silicoaluminate or yellow prussiate of soda, which can leave a persistent white fog on fresh copper. Stick to pure kosher salt or pure sea salt with no additives.
- Soaking the Entire Pan in Juice: Never submerge an entire pan in an acid bath. Acid creeping beneath the curled edge of a rolled rim or under the mounting flanges of cast handles can linger unseen, causing corrosion from the inside out.
- Using Green Scouring Pads: Synthetic scouring pads contain mineral abrasives designed to strip steel. On soft copper, they leave deep micro-scratches that scatter light and ruin the reflective clarity of the surface. Stick to natural fruit pulp, sea sponges, or soft cloths.
- Polishing Over Food Carbon: Burnt oil or carbonized sugars must be softened with hot water and baking soda first. Scrubbing hard carbon with a lemon half simply drags sharp burnt flakes across the bare metal, scarring the face.
Practical Next Steps and Long-Term Maintenance
After your copper vessels are washed, neutralized, and buffed dry, store them in a dry area with steady airflow. Avoid storing copper cookware directly against damp plaster walls, over unvented dishwashers, or under open windows where night air brings seasonal humidity changes. If you must stack copper pans inside a deep drawer, place circular rounds of wool felt or thick unbleached linen between them to protect both the outer copper shells and the soft inner linings from friction gouges.
For regular post-cooking cleanup, wash the pan using simple hot water, a soft cloth, and neutral vegetable-based dish soap. If grease films develop on the exterior, clean them promptly before they bake onto the copper during the next cooking session. Should you encounter persistent discoloration on an heirloom piece, structural cracking along a rivet seam, or exposed raw copper on the food-contact interior, set the piece aside and consult a professional metalsmith or tinning specialist. With thoughtful hand care and occasional cleanings, your copper cookware will outlive multiple generations of cooks, carrying its working character forward in the metal.